Reports are a great way to see data you have gathered in an easy-to-digest format. However, what if I told you haven’t really “seen” until you have worked with Salesforce Dashboards?
Keep reading to learn more about dashboards AND how to create your own!
What are Dashboards?
Dashboards are a graphical representation of Reports used in Salesforce. They show data from source reports as visual components. These components provide a snapshot of key metrics and performance indicators of the organization at a glimpse. Who doesn’t enjoy customization!? With Dashboards you can individualize components to display data that suits your style, and view your key metrics.
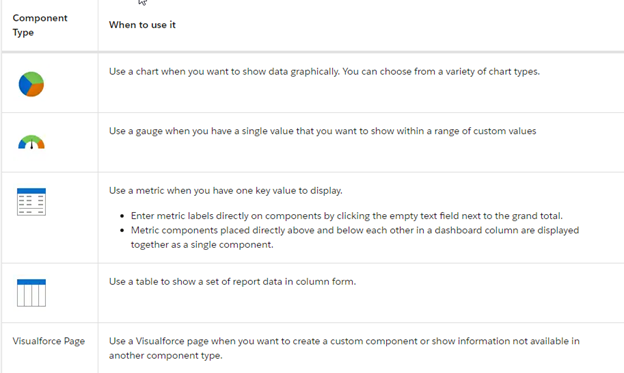
Dashboard Components
Components are what make Dashboards come alive! They are the building blocks of your Dashboard and a gateway to Salesforce Narnia (not a real place). So, what are Dashboard components? What are the different types? Dashboard components can be charts, tables, gauges, metrics, and Visualforce pages. In simpler terms, components are pictures of your data.
Here are steps to follow:
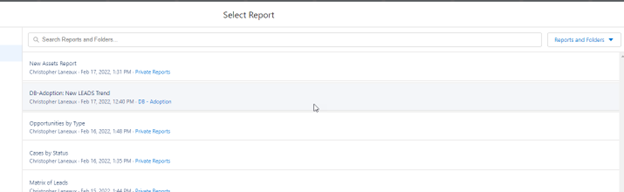
Step 1: Create Salesforce Dashboards
Step 2: Select Report
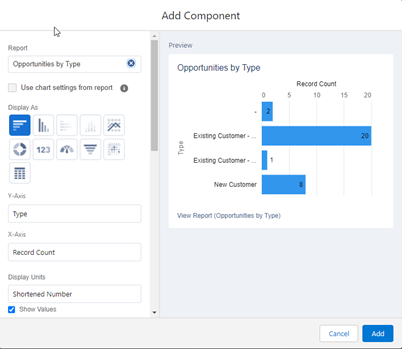
Step 3: Add Component(s)
Step 4: Save Dashboard
There you have it! A nice, clean look at your data. Dashboards allow you and your team to see the data that really matters to you.
SalesforceDashboards Fun Facts:
Dashboard Filters
Dashboard filters make it easy for users to apply different data perspectives to a single dashboard. Filtering rules apply to fields from the dashboard’s source reports. After filters are defined, a user viewing the dashboard can select a filter to visualize the data of most interest. The filtered view is remembered – the next time the user visits the dashboard, the same filtered view is shown.
Subscribe to/Schedule Dashboards
Set up automatic dashboard refreshes and receive refreshed dashboard results by email on a schedule that you set. If you start your week by reviewing your Sales Overview dashboard, expedite your morning by subscribing to the dashboard. After subscribing, you can have it automatically refreshed and in your email inbox each Monday morning at 8:00 AM.
You can add up to 20 components to view on a Dashboard.
And there you have it! Now you can create dashboards, add components to better view reports, and customize & edit to your liking! If you’d like to learn more about using platforms like Salesforce, integrating existing systems with Salesforce, or custom platform development, we’re here to help. Drop us a line any time!
Salesforce duplicate records, who needs them, who wants them! Am I right?
With Lightning, there is an easy way to find these lurkers in our records. This agent of truth appears like the following.
This Hero is known as the Duplicate Matching Component and is fueled by Duplicate Rules, Matching Rules, and justice.
These rules can differ from company to company, but they serve as the primary identifier of duplicates. For example, in our organization, a duplicate will only be flagged on Contacts if three of the following criteria are met. 1) First and Last Name Matches 2) Email Matches 3) Account Name Matches 4) Phone Number Matches.
Finding and Merging Salesforce Duplicate Records
Like all true and good Heroes, it knows that the real work must come from all and thus will not take action against these duplicates. That is the responsibility of the masses. When found, these duplicate records must be merged and properly subjugated to the correct account.
This is done by clicking “View Duplicates”.
An important note: When a Duplicate is merged, the second record will be destroyed and the Merge CAN NOT be undone.
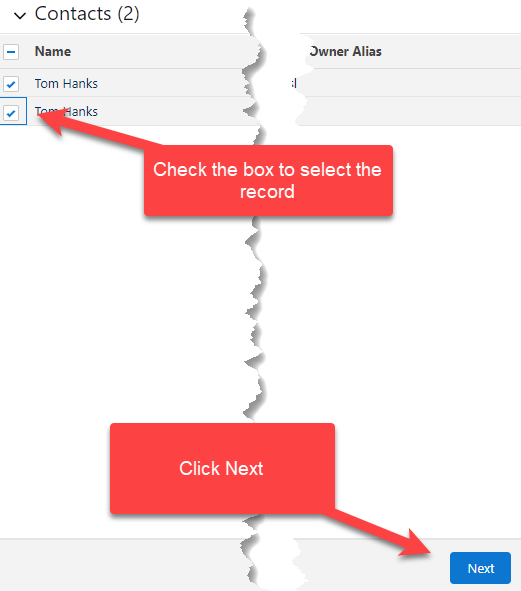
From here, select the records you would like to merge. Click next.
When a record is merged all related records will be moved over as well. The Chatter Feed will only be preserved on the master records. Best to look through and see if there is any information that needs to be kept. Files uploaded to the chatter feed or saved to the records will be saved on the merged records.
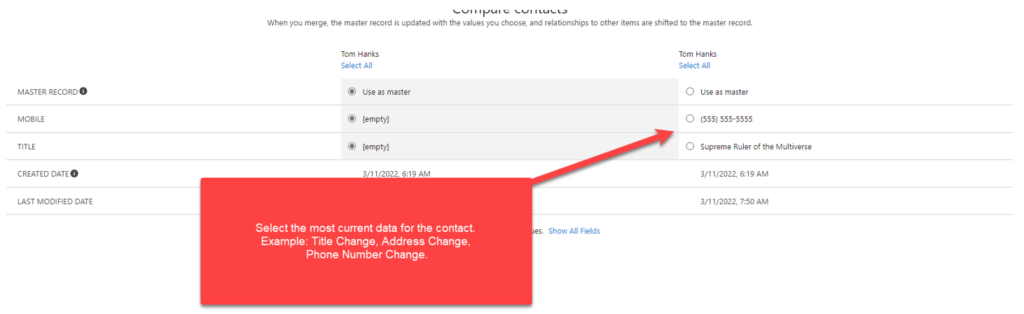
Merged Records
In this next screen we will decide which record is the master and which record is going to be merged into the master.
Best practice is to use the oldest of the two records or the record that has the most records related to it. By that I mean if a Contact has 10 more Opportunities attached it, that one should be used.
Click Next.
Here our good and faithful hero explains to us again the importance of this task and reminds us the Merge CAN NOT be undone.
When you are sure that you gathered the correct information and most current information. Click finish. Lean back and know that you did good work.
Well done. Our Hero solutes you.
If you have questions about how to identify and delete duplicate records, or any other Salesforce questions, the crew at ForceMedic Design would love to help. Give us a shout here!
Business Processes are the core of what a company does on a regular basis. It is critical they are documented, reviewed, and updated on a regular basis. A documented process often highlights: Why it exists, Starting Points, Inputs, Outputs, End Points, Visual Map, and Roles. They become pivotal for training, audits, quality improvement, and intercompany conversations. Let’s dive further into creating maps to better understand business processes.
How do I start using maps to better understand business processes?
The most challenging piece for most… How do I get started when I do not fully understand our business process? Well, it is easy! Is there already documentation in place? If so, begin to review that information and identify how old, who created it, and who owns the process. From here, begin by reviewing this documentation with your Subject Matter Experts (SMEs). Look see what the inputs and outputs of the process are. What if there is no documentation? Determine who the SMEs are and ask to record a video of running with the process live. Or walk-through steps and record them. This serves as the perfect place to begin your Process Map.
What tools can I use to create a Process Map?
Check out Lucid Chart or Draw.io. Both are terrific design tools and have free versions. While using, try to select shapes specific to Business Process Model and Notation (BPMN or BPMN 2.0). These are standard and widely known shapes in many industries.
Sometimes it is best to meet with SMEs directly and draw a map out together on a marker board, especially if you are drafting what a future process will look like! You can always take a photo of the artwork and bring it back to ‘Lucid Chart’ or ‘Draw.io.’
Okay, now that we have the basics down, let us move to the topic at hand.
How do I use Maps to make Business Processes easy to Understand?
Use the 80% Rule. For this process, what are we doing 80% of the time? Do not let that single instance override what we do on a regular basis.
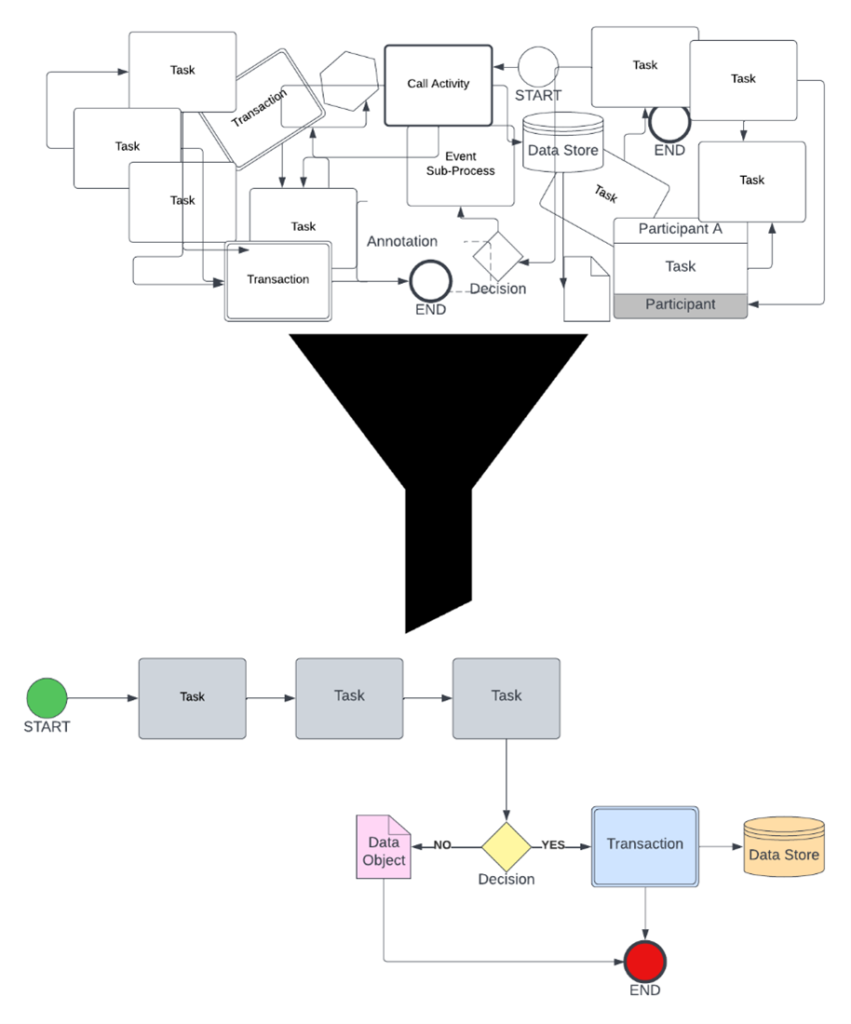
Keep it short when describing the task. Rule of thumb is 3-5 words per node (shapes).
Do not be afraid to use a Legend. This is a handy way to use acronyms on the shapes themselves and shorten text.
Organization is CRITICAL. The moment the map is confusing and difficult to read, it becomes useless. Use the guidelines within ‘Lucid Chart’ or ‘Draw.io’ to keep nodes symmetrical. Limit the use of too many angles when connecting nodes, they should only have (1) right or left angle. Keep lines separated from one another, this way routes are easily followed. Use colors to highlight Tasks, Decisions, Start, End, etc.
See example:
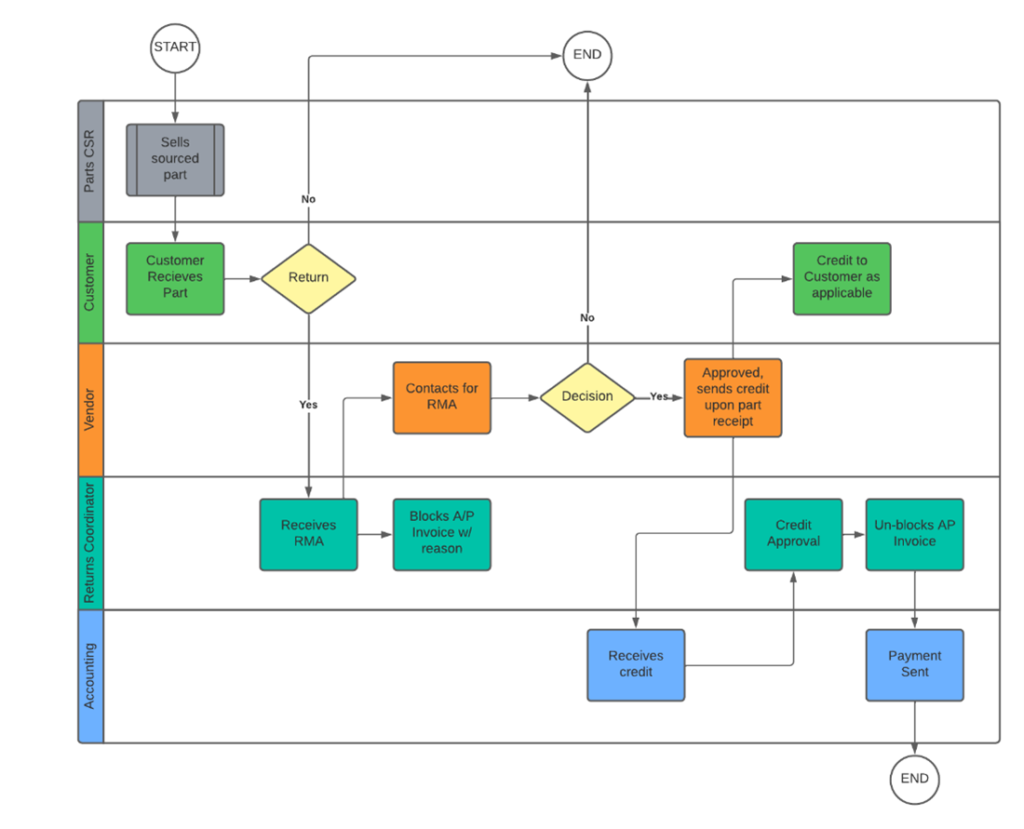
What if the Business Process involves numerous teams or departments?
Answer: Swim Lane. These diagrams are critical to visualize how tasks and data reach other teams / departments. They are especially useful when showing process handoffs between teams.
Tip: Use the same colors for each lane. It makes it easier to read and understand where you are.
What do all the shapes mean?
The most widely used shapes for a business process map are Task (square), Decision (Diamond), Circle (start or end), and Dotted Square (to call out a Sub-Process or Supporting Process).
In this article, you have learned that Maps (which support documented company processes) are an excellent way to better understand what businesses do in detail. Knowing why it exists, how to create them, better support audits, quality improvement, and intercompany understanding. Sometimes the easiest approach is to start with drawing it out on a whiteboard!
If you’d like to learn more about using platforms like Salesforce, integrating existing systems with Salesforce, or custom platform development, we’re here to help. Drop us a line any time!
Alright, everyone. We have all heard of calendars and we all know Salesforce has them. Now, it’s time to ask: Salesforce calendars: What are they? What do they do? How do they work? What do they not do?
What are Salesforce calendars and what do calendars do?
We all know what a calendar is. We have seen them on walls and refrigerators since we were children. In Salesforce, calendars are used to collect objects, like events and tasks, and display them on a calendar. Any object with a date field can be displayed on a calendar. Public Calendars, however, can only display events.
How do Salesforce calendars work?
Personal Calendars
Personal calendars are object-specific. In other words, you can have a calendar for events and tasks but you cannot have one calendar that shows both.
Public Calendars
These calendars can only hold events and will only show events assigned to the calendar.
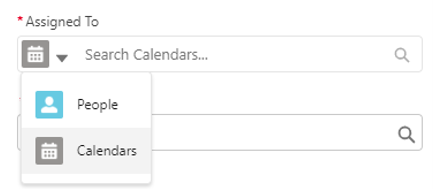
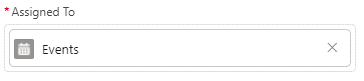
When you create an event, instead of assigning that event to a person assigned the event to the calendar. It looks like this. If you have access to the calendar, you can assign events to it.
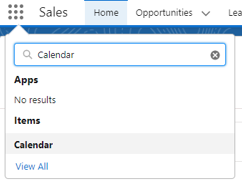
How to add calendars to your calendar.
After navigating to calendars using the app manager or tab.
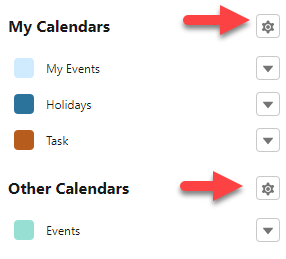
On the bottom right of the page, you will see every calendar that you have either created or that has been shared with you. Using the gear by “Other Calendar” you can add public and personal calendars. Use the gear close to “My Calendars” to create a new personal calendar. To toggle what items are displayed simply click on the colored square.
The different ways Salesforce calendars can be viewed.
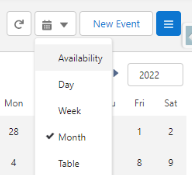
Calendars can be viewed by day, week, or month. Calendars can also be displayed as a list view using “table view”. If you select table view you are taken to the “recently viewed” events list view
And there you have it! Now you know what Salesforce calendars are and how they work!
Calendars are a great way to look at upcoming and completed events and tasks. And if you find that you need access to a public calendar just reach out to your friendly neighborhood Platform Administrator.
If you have questions about how to maximize the potential of calendars, or any other, Salesforce feature, the crew at ForceMedic Design would love to help. Give us a shout here!
Salesforce is a powerful tool that holds tons of information, but most of us don’t need all of it, all the time. That’s why Salesforce allows you to create favorites of the content you want to see most with Salesforce shortcuts. You can use the favorites feature to make this readily available.
Keep reading for step-by-step instructions AND examples to create Salesforce shortcuts.
Salesforce Shortcuts: Getting Started
Content supported by Favorites:
Lists
Dashboards
Reports
Report and dashboard folders
Chatter groups
Record home for standard and custom objects
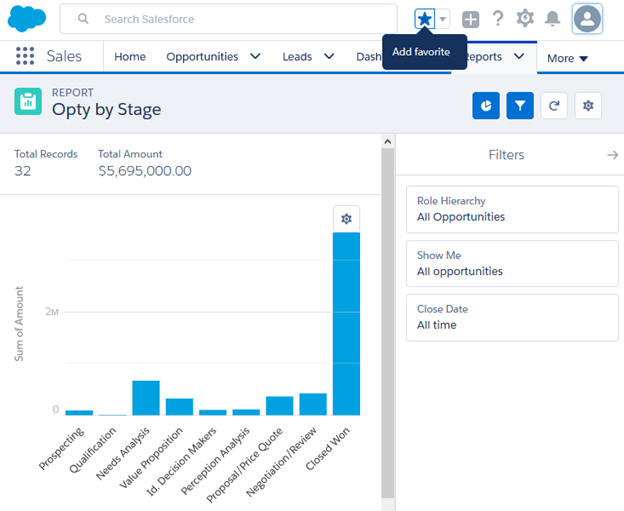
When you have a report open you can bookmark the report by selecting ‘Add favorite’ which will subsequently be added to your personal favorites list.
How to Add Your Favorites in Salesforce
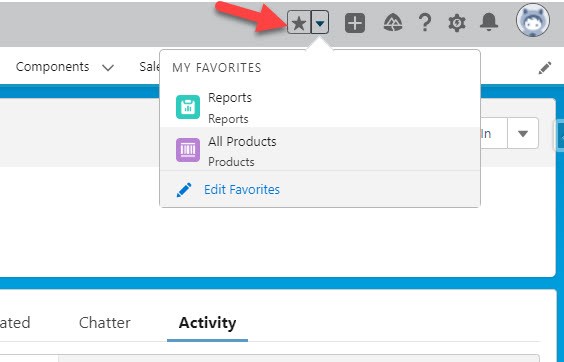
Click the star in the header menu to edit your current page.
2. Your favorites can be seen via the dropdown list.
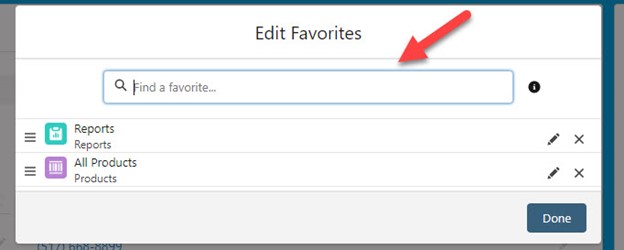
3. You can edit your favorites, rearrange the order and remove pages as well. Just as you use the search bar for records, reports, or dashboards, you can search your favorites
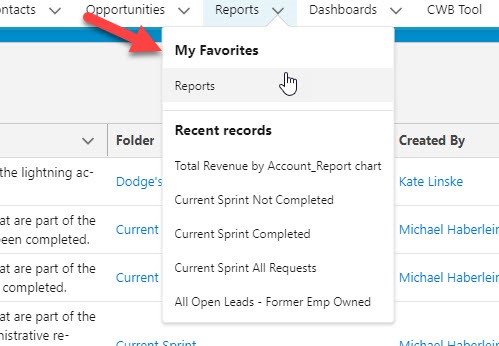
4. The Navigation bar located at the top of the page will also show your list of favorites. Using the drop down beside the object name will show you a list of recently created records, recent lists as well as favorites you have marked for that specific object.
Salesforce Shortcut User Examples
Facts about the Favorite Feature
You can have up to 200 favorites
You can’t favorite things in setup pages
Individuals manage their own favorites-Salesforce admins can’t edit or share favorites (Your own little safe space 😊)
There you have it! Now you can create Salesforce shortcuts to view your favorites! If you have questions about how to maximize the potential of this, or any other, Salesforce feature, the crew at ForceMedic Design would love to help. Give us a shout with the contact button at the top or bottom of the page!
IT’S HERE! One of the most requested features in the history of Salesforce is exiting Beta with the Spring ’22 Release. You can start using this game-changing functionality now! Before you do, allow us to share this brief overview of what inline report editing is, how it works, and what its current limitations are.
Salesforce Inline Report Editing Basics
Salesforce Reports vs. List Views
To ensure we are clear from the start, let’s review the difference between a Salesforce report and a Salesforce list view. Generally, a list view is used to quickly segment records of the same object (i.e., accounts, contacts, leads, etc.), and act on them by drilling into them and updating their fields. A report summarizes record data for analysis from multiple objects and can export to Excel. Report data can be grouped, summarized, and have custom calculations built on it that are not possible in list views. Until now, list views could inline edit and take direct action on records directly. Reports could not. That’s where inline report editing comes in.
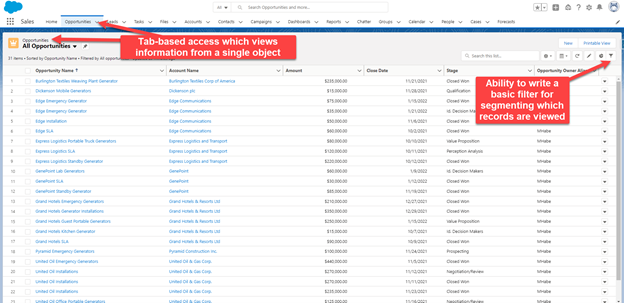
Check out this example of an opportunities list view:
And this example of an opportunities report:
What Does Inline Editing Mean?
Inline editing is the ability to change the value of a field without navigating into the record itself. This function has been available in list views for a few years and is now available from reports as well.
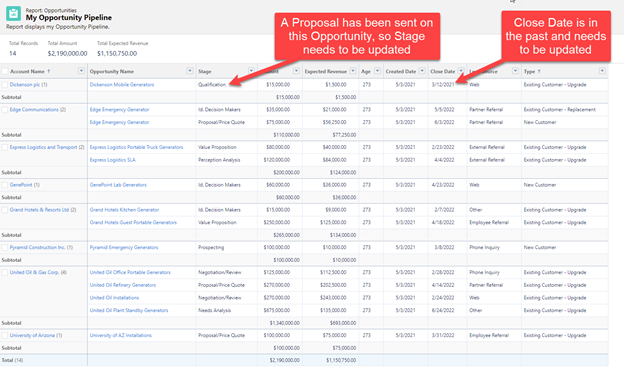
Here’s a real life example of inline editing from an audit of an opportunities pipeline report.
Scenario: I’m a Sales Team member at Block Imaging (ForceMedic’s sister company). I need to audit my opportunities pipeline to ensure I have the following:
Accurate close dates for my open opportunities (the date that I believe the Opportunity will be closed won or closed lost by)
Accurate stages for my open opportunities
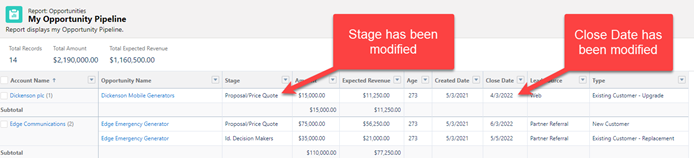
In reviewing the My Opportunity Pipeline report, I find an opportunity called Dickinson Mobile Generators that needs attention because:
The opportunity close date is in the past (as I write this) and thus invalid.
I sent a proposal and price quote on this opportunity. The stage field needs to be updated to reflect this.
Before inline report editing was a thing, I would need to manually drill into the opportunity record to change the stage and the close date fields. Now, I can make the changes right from the My Opportunity Pipeline report without going to the record itself at all!
Using Inline Report Editing
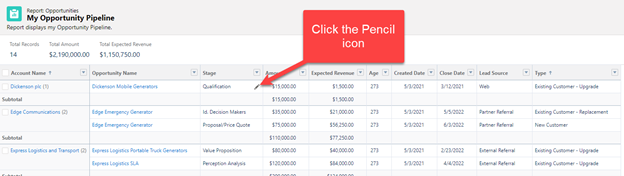
Let’s test drive inline report editing by changing the opportunity stage and close date.
As shown above, I need to change the stage field and the close date field on the Dickinson Mobile Generators opportunity. The changes I need to make are:
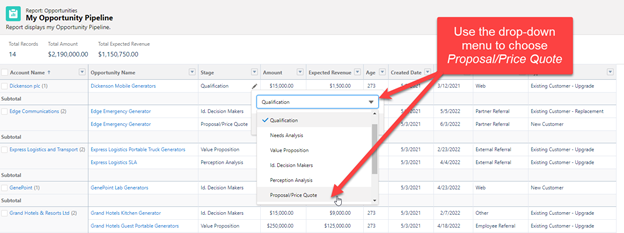
Stage field from Qualification to Proposal/Price Quote
Close Date field from 3/12/2021 to 4/3/2022
I can do this right from the My Opportunity Pipeline report by following these steps:
Stage Field Change:
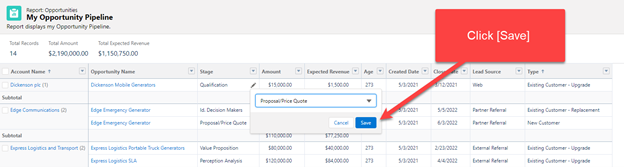
Click the pencil icon on the desired stage field
Use the drop-down menu to change the stage from Qualification to Proposal/Price Quote
Click [Save]
The stage has been changed on the opportunity record Dickenson Mobile Generators
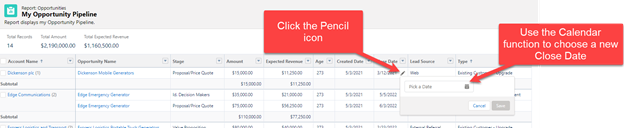
Close Date Field Change:
Follow the same steps as above to change the close date field, except instead of using a drop-down menu for step 2 we will use the calendar functionality to update the close date to April 3, 2022, aka 4/3/2022.
Click the pencil icon on the desired close date field
Use the calendar function to choose a new close date
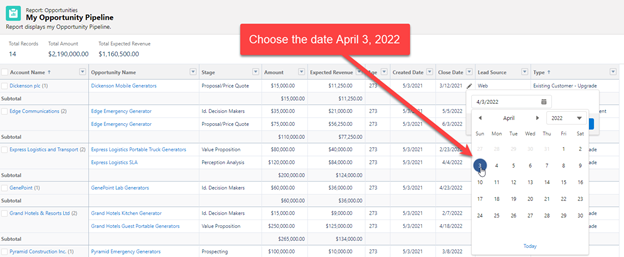
Choose April 3, 2022, aka 4/3/2022
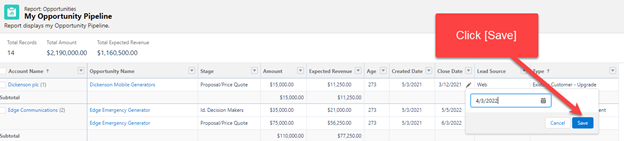
Click [Save]
The close date is updated to 4/3/2022 on the opportunity record Dickenson Mobile Generators
And with that, we have made two updates to the Dickenson Mobile Generators Opportunity:
Modified the stage from Qualification to Proposal/Price Quote
Modified the close date from March 12, 2021, to April 3, 2022, aka 3/12/2021 to 4/3/2022
Limitations of the Feature
The inline report editing functionality has been in Beta since the Summer ’21 release, and Salesforce has slowly enabled additional functionality around it as they prepare to make it available to users with the Spring ’22 release. As of now, the following limitations are in play:
Inline report editing is not available for reports in Salesforce Classic.
The following fields and field types do not support inline editing:
Task and Event object fields
Owner fields
System fields, such as Record ID and Created Date
Compound fields, including name and address fields
Encrypted text fields
Formula fields
Polymorphic fields
Standard fields of type auto number, rollup summary, record type, master-detail, long text area, rich text, and hierarchy
Fields in a Salesforce object that do not have a record type
Only one field at a time can be edited right now.
With the Spring ’22 Release, Salesforce states we will be able to edit multiple fields at once so stay tuned for updates regarding that functionality!
Inline Report Editing Is LIVE
The ability to use inline report editing is active for all users with the Spring ’22 Release! With the time savings and convenience you’ll enjoy, we think you’ll be on the edge of your seat to see where future releases take this new feature. If you have questions about how to maximize the potential of this, or any other, Salesforce feature, the crew at ForceMedic Design would love to help. Give us a shout with the contact button at the top or bottom of the page!