Salesforce debuts a comprehensive release of new features and apps three times per year (Winter, Spring, Summer). These bring all sorts of goodies to the platform. The Salesforce Winter 2022 release is here and there are several new features we’d like to put on your radar.
It’s part of our job at ForceMedic to review these new features and ensure they play nicely with our build. The following three play very well and we think you’ll love them too!
3 New Salesforce Features for 2022
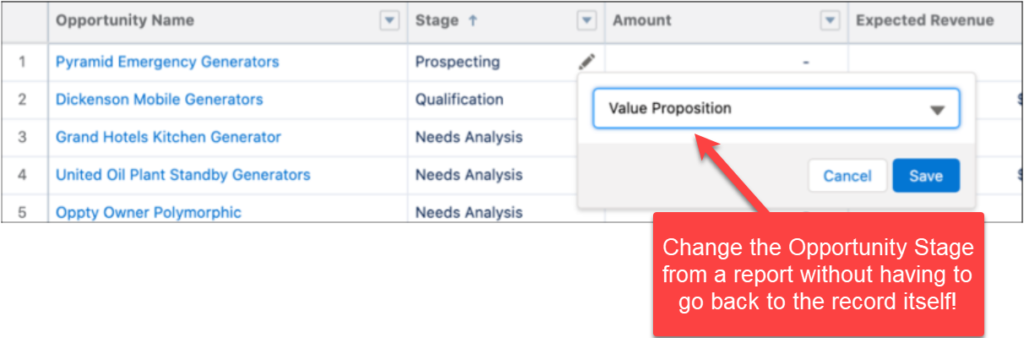
Inline Editing of Report Data
The ability to update data through inline editing on reports has been in beta for 6 months. Now it’s finally being released for all Salesforce orgs, platform-wide. As a result, we can update reports more efficiently because we don’t lose our place clicking back and forth. On October 2nd, we can edit date, picklist, and lookup fields without leaving a report to find the record and update fields from there. This could save hours in productivity.
Email Template Builder Updates
Salesforce made a lot of updates to the Email Template Builder over the last several releases. Several more are coming in the Winter 2022 release. These offer more options in creating and using custom email templates.
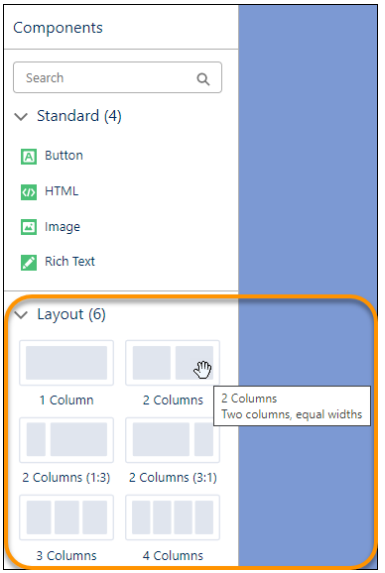
Add Rows and Columns to Your Email Templates
Use the Layout component to easily add a row to your Email Template Builder or Email Content Builder template. Select a layout with no columns or a set of up to four.
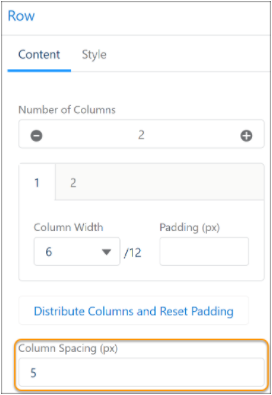
Add Column Padding
Padding between columns in Email Template Builder gives them definition. Before, you could pad content in an individual column. Now, you can evenly pad space between all columns.
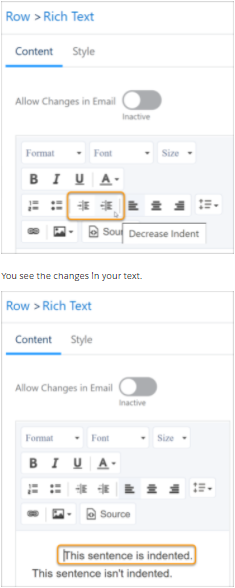
Add Indentations to Emails Templates
Indenting creates visual variety and organizes text in your templates. Varying indents emphasize text and make it easier for email recipients to notice it.
Create Longer Subject Lines
The Subject field in Lightning email templates and email templates from Email Template Builder can now be up to 1,000 characters, up from 230 characters. As a result, you can engage readers with more descriptive or eye-catching subject lines.
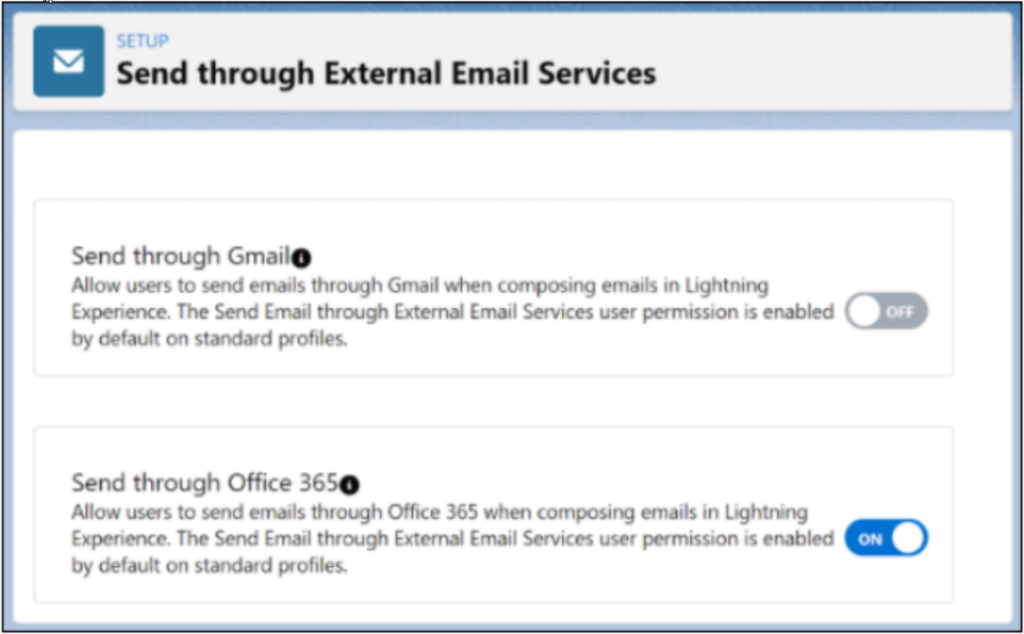
Send List Emails via Your Email Provider (BETA)
List emails let us run marketing campaigns from Salesforce to as many Contact or Lead records as we want (up to 5,000 emails per day). These emails were once sent using only Salesforce, and the system was notorious for formatting issues, bounces, and spam flags.
Because of these issues, Salesforce is running a pilot program that sends list emails through Outlook. Now, the Lightning for Outlook app links these email campaigns to our Lead/Contact records. This give a 360-degree view of communications we have engaged with those records on.
Excited for the Salesforce Winter 2022 Release?
The team at ForceMedic is always excited about a new Salesforce release, but we hope we’ve built some excitement on your end too. If you’d like to learn more about working these, or any other, features into the way you use Salesforce, we’d love to help! Please contact ForceMedic Design to learn more.
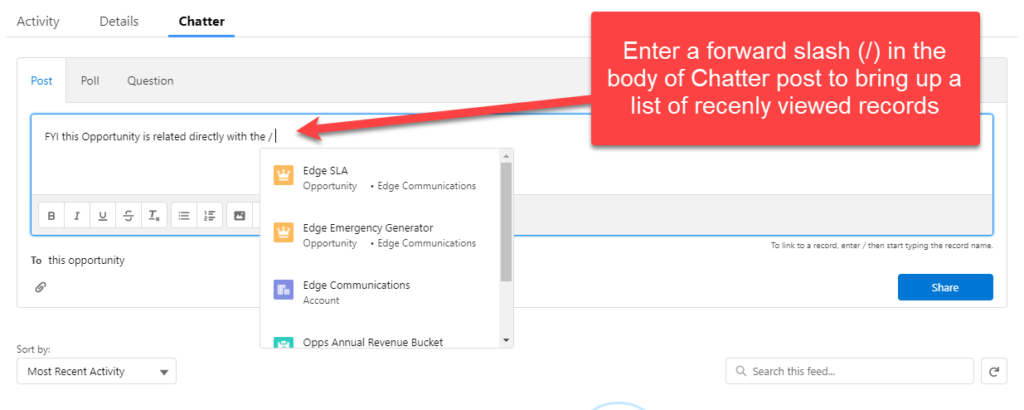
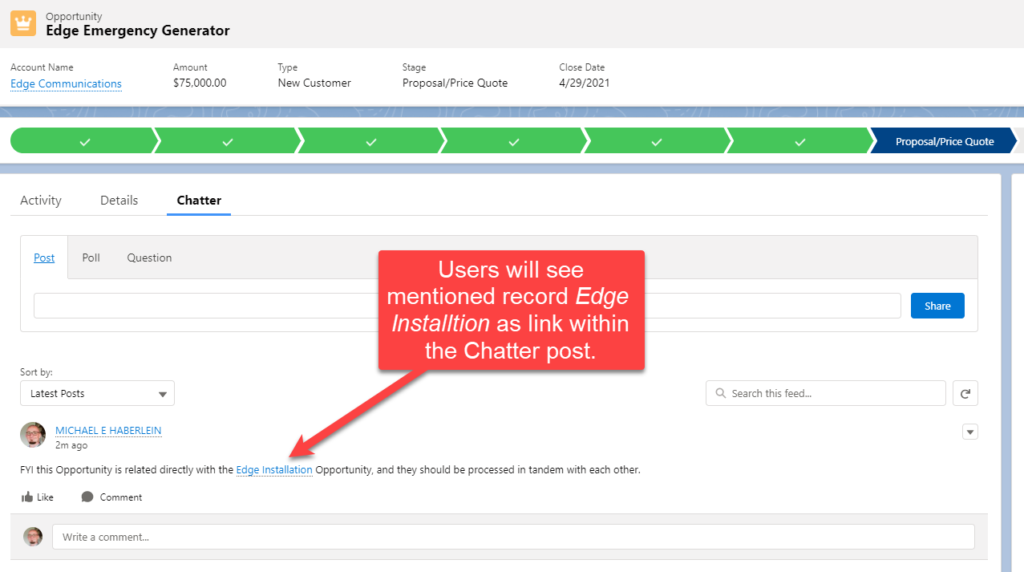
Did you know that in Salesforce Lightning, you can directly reference recently accessed Salesforce records in Chatter by using the forward slash ( / )? The ability to directly tag records in Salesforce Chatter is an important tool for streamlining communications and increasing sales team synergy. Directions on how to do this are below.
1. Enter a forward slash (/) in the body of a Chatter post.
Entering a forward slash into your Chatter post tells Salesforce where you want to insert your link.
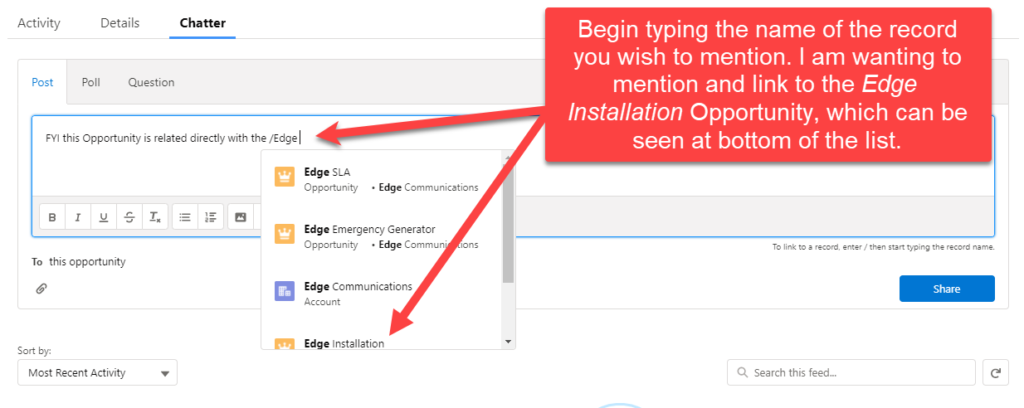
2. Start entering the record name.
Begin typing the name of the record you want to link and Salesforce will begin populating a list of recently viewed records with names that contain those words.
3. Select a record from the list.
IMPORTANT: Records on the list are returned as the result of a search, and the search returns only the records that you’ve looked at recently. So, if you’ve never viewed or interacted with a particular record, or if it’s been a very long time since you have, it will not appear on the list.
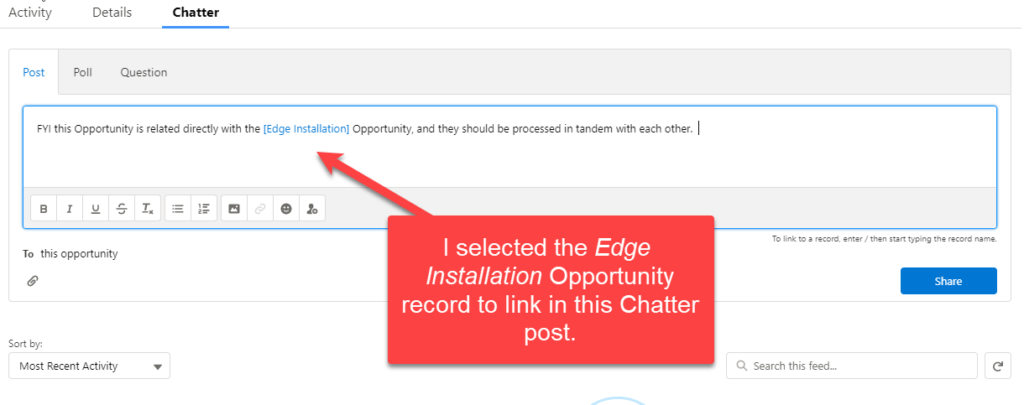
4. Finish writing your post or comment and click Share.
The users who can access the record can also see the record name as a link within the Chatter post. The users who can’t access the record, due to their assigned role or permissions-based limitations, will see a Record Not Available message instead of a link to the record.
Using these direct links to tag records in Salesforce Chatter will make your team’s communication clearer, cleaner, and faster! If you would like to know more about this or any other Salesforce functionality, bookmark this page for more tips (weekly) on using Salesforce more efficiently and effectively. If you’d like to dive even deeper and explore system integrations or custom tools, please contact ForceMedic Design, where we love talking platform development.
Ever add a new option to your Salesforce picklist, navigate to a record, and don’t see the value you just added when you click edit? Being the awesome admin that you are, you of course clear the cache and excitedly await the page reload… but nothing, still the Salesforce picklist values are missing. Now what?
Locating the Missing Picklist Value in Salesforce
No, you don’t need to be a sleuth – this case will be resolved shortly. The thing to remember is Salesforce picklist values are controlled by Record Type. It is a beautiful thing really, this is what allows you to have the same field present different picklist values based on the record type.
Adding the Salesforce Missing Picklist Value
Let’s use an example of an Asset record type to clear this up. To resolve this, navigate to:
Setup –> Object Manager –> Assets –> Record Types
Then, pick the record type where you want the picklist values to appear and click on the record type label:
Then pick the “Picklist” you want to manage (in this case, “System Type”) and click “Edit”:
From there you can “Add” or “Remove” the values you want available for this record type:
Once done, just hit “Save”. Repeat this for every Record Type you want to manage the picklist options on.
Salesforce Missing Picklist Value Resolved
There you have it, you are back to being an awesome admin! You now have one more trick up your sleeves when you are missing a Salesforce picklist value.